How to stay afloat in your inbox!

It’s been a while since I’ve posted an article. The reason is a job switch, since the project (where this blog is part of) has been completed . I’m glad to be part of the team Industrial Productdesign of Howest as an office manager! This means for you readers that I will no longer be writing hypothetical, but purely from my experience as an office manager. I like to tell you some of my (MS) office stories, mainly the most frustrating ones. ;)  And hopefully I’ll find some tips and tricks solving them. For starters..

Good to know in MS Outlook
A couple of months ago I took a quick MS Outlook course given by my IT colleague, Ms Willaert, of Howest. She has taught me a few tips in Outlook which I like to share with you guys. If you are one of those who plaster relative expensive post-it notes all over your desktop so you wouldn’t forget anything -like I did before – this article is definitely worth your time!
navigation pane

Many people limit Outlook to an e-mail processing program, but the software has much more to offer. If you use every aspect of the navigation bar, including calendar, tasks and contacts, you will see that it is a great tool to organize your professional life. And moreover, it is a flexible program that you can configure to how you want it…

Tip #1: Make Outlook Today your default page
I start my workday in Outlook Today, it gives a great overview of my upcoming appointments and current tasks. From here I can consult my messages as well. Outlook Today is an unique feature, as it consolidates all this important information.

Outlook does not start by default in the display of Outlook Today, but in the display of your inbox. If you like to change these settings to Outlook Today, click on your account name in the bar on the left (to open Outlook Today) and click on ‘Customize Outlook Today…’ in the right upper corner. I like this one a lot!

outlook today

Tip #2: How to get tasks and appointments out of your inbox
On the basis of an email, it is possible to plan an appointment in your calendar or to add a ‘To Do’ to your tasks. To do so: open an email which contains a save-the-date or a to-do, go to Quick Steps on the ribbon and choose -depending on the content of the email- ‘appointment with text of message’, ‘appointment with attachment’ or ‘task with text of message’ or ‘task with attachment’.

Make from an email which contains a ‘save-the-date’ an appointment in your calendar via the Quick Step ‘appointment with text of message’.

You probably have to make these specific quick steps, do this as follow: click in the ribbon on the arrow of ‘Quick steps’ to open the dialog box ‘Manage Quick Styles’ and select in the dropdown menu ‘New, ‘Custom’. In the dropdown menu ‘Choose an action’ you will find these options, click ‘finish’.


Tip #3: How to organize your inbox.
First of all, there are several ways to change the layout of your inbox (tab View > Layout). You have the Folder Pane on the left, the To-Do Bar on the right, the Reading Pane in the middle and the navigation bar below. Each of these can be turned on or off and can be adjusted to your preferences!

Short-term, there are different ways to organise your email. It’s up to you to decide which of the options (or combination of options) below you’ll use. I’ll shortly introduce them:

  • You can organize emails into a folder structure. It is similar to the way you save files in File Explorer. This means that you place an incoming email in a folder off the  (sub)folder pane on the left. You make a (sub)folder by right clicking on -for example- ‘Inbox’ > option ‘New Folder’. There are several ways to place an email into a folder: by dragging, using the shortcut menu, via Quick Steps, by creating a rule,…

    some examples of folders
  • Another way to organise your inbox is by creating and assigning color categories.

    First you have to decide which categories are meaningful to you and create them via the feature ‘Categorize’ on the ribbon. The same categories can also be applied on your calendar and tasks items. Just try to contain yourself from turning your inbox into a gayparade. Less is more. ;)

  •  If it is not possible to deal with an email immediately, you can flag the email. With  a flag you mark an email for follow-up. Flagged items also appear in the Tasks.

 With the feature ‘Filter Email’ on the tab Home it is possible to only show certain items, like mail with a specific category or flagged emails. 

Long-term, you can archive your email according logical time periods.

Further tips:
Unless your job requires otherwise, try to refrain from checking your inbox all day long. Twice a day is recommended, once in the early morning and at the end of your work day. 
I know, this is not as easy as it sounds, but it helps to turn off desktop alerts, these are the notifications that appear on your desktop when you receive a new email. In this way, you don’t let every new message interrupt your workflow and you’ll get more done!
You can turn them off by going to tab file > options > mail. Under ‘message arrival’ clear the notifications you wish.


If it reassures you, you can set up a notification for those emails who are marked with an exclamation mark. And in the end there is an other highly technological marvel where they can reach you, the telephone.


It is a waste of time to get back to an email you already read once, but that you need to read again in order to pick up and answer, isn’t it? Try to read emails when you have time to process them as well. If you really can’t hold your horses, and keep checking those emails, try to deal with the ones where you only need a couple of minutes to answer.. Flag the others so you know you still have to reply.

You don’t need to send thank you-emails, a ‘thanks in advanced’ will do.

Hope these tips will save you time, time which you can invest in reading my other articles, here below!

Based on MS Outlook 2016
How to work out the right size for images in MS Office

Instead of signing up for gym or telling yourself you’ll run at least once a week, try the following New Year’s resolution! Apply the right resolution for your images in the MS Office Suite.

To decide on the image size of your pictures in MS Office, you should always keep the target output at the back of your mind: is the picture part of a Word document that will be printed or is it inserted to a slide that will be projected?

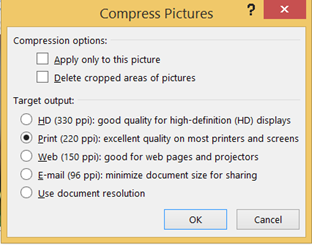
The dialog box Compress Pictures on the contextual tab Picture Tools in Word provides good guidelines.

From this we can conclude that a printed picture should have minimum 220 ppi to look good on paper. But what does this mean exactly?

ppi stands for pixels per inch and 1 inch is equal to 2,54 cm

In terms of print, we express ourselves in centimeters or inches, we talk for example about an A4 of 21 cm x 29, 7 cm. So here is a little problem: suppose you insert a picture of 1024 x 664 pixels in your word document which you will eventually print. What are the maximum dimensions of the picture to make a print at a resolution of 220 ppi?

The answer is 11,82 x 7,67 cm or 4,65 x 3,02 inch. In this case these are the limits for a good print quality. (The calculation for e.g. the width in cm is 1024/220*2,54)


Forget about ppi, centimeters and inches to determine the resolution of your PowerPoint images. You just have to base the size of your digital images (in pixels) on the dimensions of your projection device (screen of projector). For example, if you project your presentation on your HD widescreen laptop with a screen-resolution of 1920 x 1080 (=1920 pixels wide and 1080 pixels high), a full-slide picture should have a resolution of minimum 1920 x 1080 pixels to look sharp. If the picture fills only the right half of the slide, the resolution should be 1920/2 x 1080 or 960 x 1080 pixels. Simple enough, right?

If you like to show a full-slide picture on a projector, your image should at least be 1024 x 768 pixels as this is quite a common resolution for projectors. Though, mind you, these days a lot of projectors are being welcomed in the high definition world, so if you know this is the case, just use 1920 x 1080.

And we haven’t started about 4K yet. ;)

How to round the corners of several rectangles equally?

Aiming for a consistent look, you like to apply the same round corners for the picture as for the text box below. This seems logical, but it’s not so obvious in MS Office…


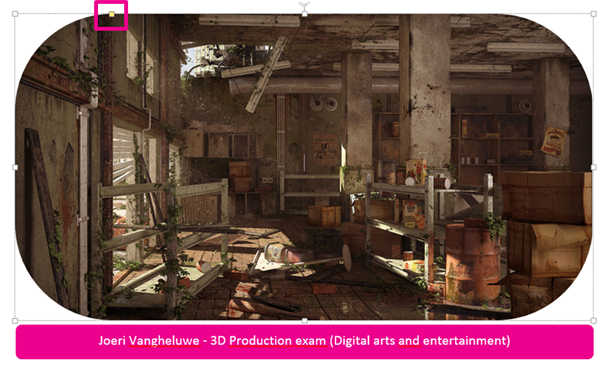
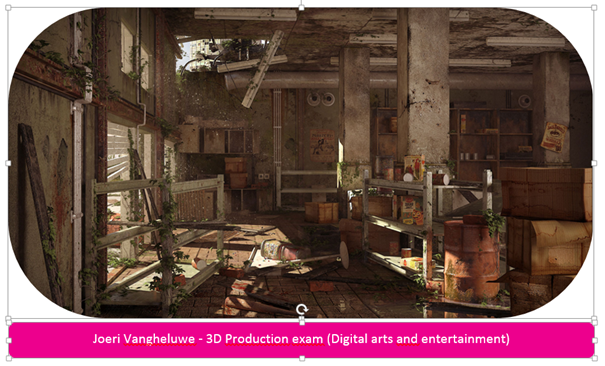
Both picture and text box are Rounded Rectangles: one with picture fill and the other one used as a text box.

When you select one Rounded Rectangle, a yellow diamond handle appears in the upper left. By dragging this handle, you can adjust the rounding of the corner.

But when both Rounded Rectangles are selected, no yellow diamond handles show up. In other words, it is not possible to round the corners of both shapes simultaneously.

Nevertheless, it is possible to resize several shapes, change the fill and the outline, the shape, the text fill, the position, the text wrapping,… of several shapes simultaneously. So why is it not possible in this case? That’s a shame.

If you want several Rounded Rectangles with the same size, copying one shape with the desired curvature is a good solution.
But when you resize a copied Rounded Rectangle, the radius of the corners does not remain the same. So this is not a solution for the given example, of which the text box is a lot lower than the photo frame.

Is there a way to resize a Rounded Rectangle without the corners changing?

Knowing the exact degree of the rounding would be a great help, as it would enable you to apply the same radius to all round corners, but such indicator does not pop up (cfr. the Adobe suite).

Trying to imitate the same curving by sight seems the only way to get equally rounded corners. It does not take much effort to do this once, but imagine this rounded corners are part of your corporate identity… adjusting each rectangle individually would take up a lot of time. Besides, this working method gives you no control on the exact degree of curve so consistency is virtually impossible.

Feel free to share any insight on this problem or another workaround!


Based on MS Office 2013

How to implement house style elements in MS Office

Throughout various publications of Howest (which are made in the Adobe suite) texts who require special attention are presented in rectangular balloons.
Copying this balloons in MS Word, I notice this is not as simple as I thought.

Howest callout 2

In MS Office these balloons are called ‘rectangular callouts’. You can insert them by clicking on the insert tab > shapes.
After inserting, you can adapt the tail of the balloon and it is possible to edit the points of the shape as well (to do so: select the callout > tab drawing tools > edit shape > edit points).
To make sure text fits within the balloon, check the option ‘resize shape to fit text’ and if nessecary change the margins.

Once you did all your adjustments, you can save the customized callout to the quick part gallery (to do so: select the callout, insert tab > save selection to quick part gallery > gallery: text boxes, options: insert content only…)
So far, so good. But, when I insert text in the callout, the tail changes along with the length of the text: long texts get a sharp tail, short texts a stomp tail, as you can see in the example below.

ms office callouts


I cannot find a way to keep the shape of the tail consistent. The Format Painter only copies the fill and outline, but not the exact shape of the balloon.
The same goes for setting the balloon as default shape (right mouse click on outline of the shape > set as default shape)

As I mentioned before it is possible to change it manually (one by one), but this is not very precise and very time consuming, especially if you have to format a document with a lot of balloons.
Hence plenty of reasons to pick an alternative “call out”, of course, still respecting the overal look and feel of the house style.

printscreen onthaalbrochure_2

Moral of the story: try to find a workaround!
It is not always possible to implement a house style perfectly in MS Office, as there is not always an efficient workflow available. In that case it is better to compromise and save a lot of time which can be devoted in writing these blogs ;)

Based on MS Office 2013

How to get your favourite image in a shape

My colleague and I used to have a very complex way of inserting an image into a shape. While I was listing all these steps for my new blogpost,  I came to realize that this complex process did not meet the standard MS Office usability. My hunch was confirmed when  I searched for an easy method of working and found one! I’m glad to share this shorter method with you.

Insert a shape (to do so: go to the tab ‘insert’ > ‘shapes’), go to the contextual tab ‘drawing tools’, click on the dropdown menu ‘shape fill’ and choose ‘picture’. Select the picture you like to insert.

picture in shape_1

Now the image is in the shape, but does look stretched or squashed and may not positioned the way you want.

To fix this, there’s just one more small thing to do: select the shape, go to the contextual tab ‘picture tools’, go to the crop function and choose ‘fill‘ in the drop-down menu. Now the dimensions of your picture are respected and you can position the picture as you prefer.

picture in shape_2
Tip: Use the shift key!

Based on MS Office 2013

How to change the font of your document easily

Changing the fonts of a large word file or a PowerPoint presentation with a lot of slides can be either a real pain or a piece of cake. To experience the last, it is necessary to set up your document well from the beginning.

Starting from scratch, this is how it works:
Each theme can have two different fonts: one heading font and one body font. It is prefered to have maximum 2 fonts in this division as a lot of fonts can quickly appear messy, which makes a text more difficult to read.

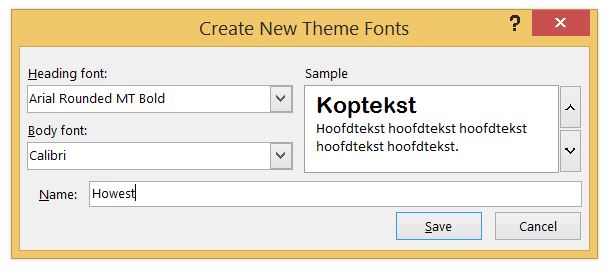
Go to the tab ‘design’ and click on the drop-down menu ‘fonts’ > ‘customize fonts’, select two fonts you like to use and pick a name for the theme.

Howest fonts

Whether or not you use styles (in MS Word) or slide master (in PowerPoint) make sure you always use this heading or body font troughout the whole document: just by choosing the theme fonts in the dropdrown menu on the home tab (Word or PowerPoint) or by doing the same for each style you use in Word.

themefonts

Now all text is based on the theme fonts. So if you change the fonts of this theme or choose a complete other theme, all text in your document will change along.

No need to adjust the font of each slide (PowerPoint) or each style (Word) one by one, with a couple clicks of the mouse the job is done!

Based on MS Office 2013