If one slide after another is filled with bullet after bullet, try this for a change!
Step 1: Click in the text placeholder or the text box and press Ctrl A to select all content Step 2: Click right and choose Convert to SmartArt in the menu Step 3: Choose the type of SmartArt graphic that visualize your information correctly: list, process, cycle, hierarchy,…
Tip: SmartArt is not so flexible and therefore often a pain to modify. Luckily, it is possible to convert a SmartArt graphic to shapes and text boxes. To do so select the SmartArt and press Ctrl + Shift + G twice or go to the contextual tab SmartArt Tools > tab Design > dropdown menu Convert (in the Group Reset) > Convert to Shapes.
The feature Convert to Shapes is not available in Word, but you can copy-paste from one application to another.
A bulleted list in PowerPoint
After converting the bulleted list to SmartArt
After converting the SmartArt graphic to shapes:
any shape can be moved, resized, or deleted independently of the remaining shapes.
Sometimes it’s handy to have slide numbers to refer to. How to number your slides is fairly easy so I’ll keep it short and simple!
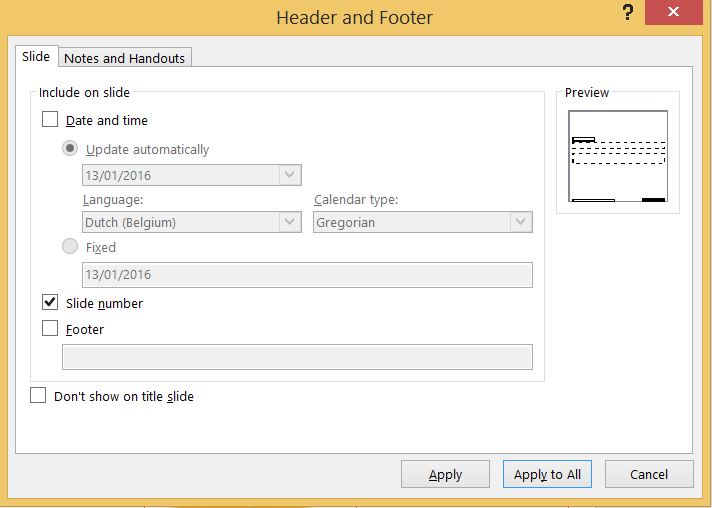
Go to the tab Insert and click on the command Slide Number in the group Text. The dialog box Header and Footer opens. Tick Slide number and choose Apply or Apply to All et voilà, a slide number appears on the slide(s).
Troubleshooting
If this does not work, you will have to change some settings in the Slide Master View.
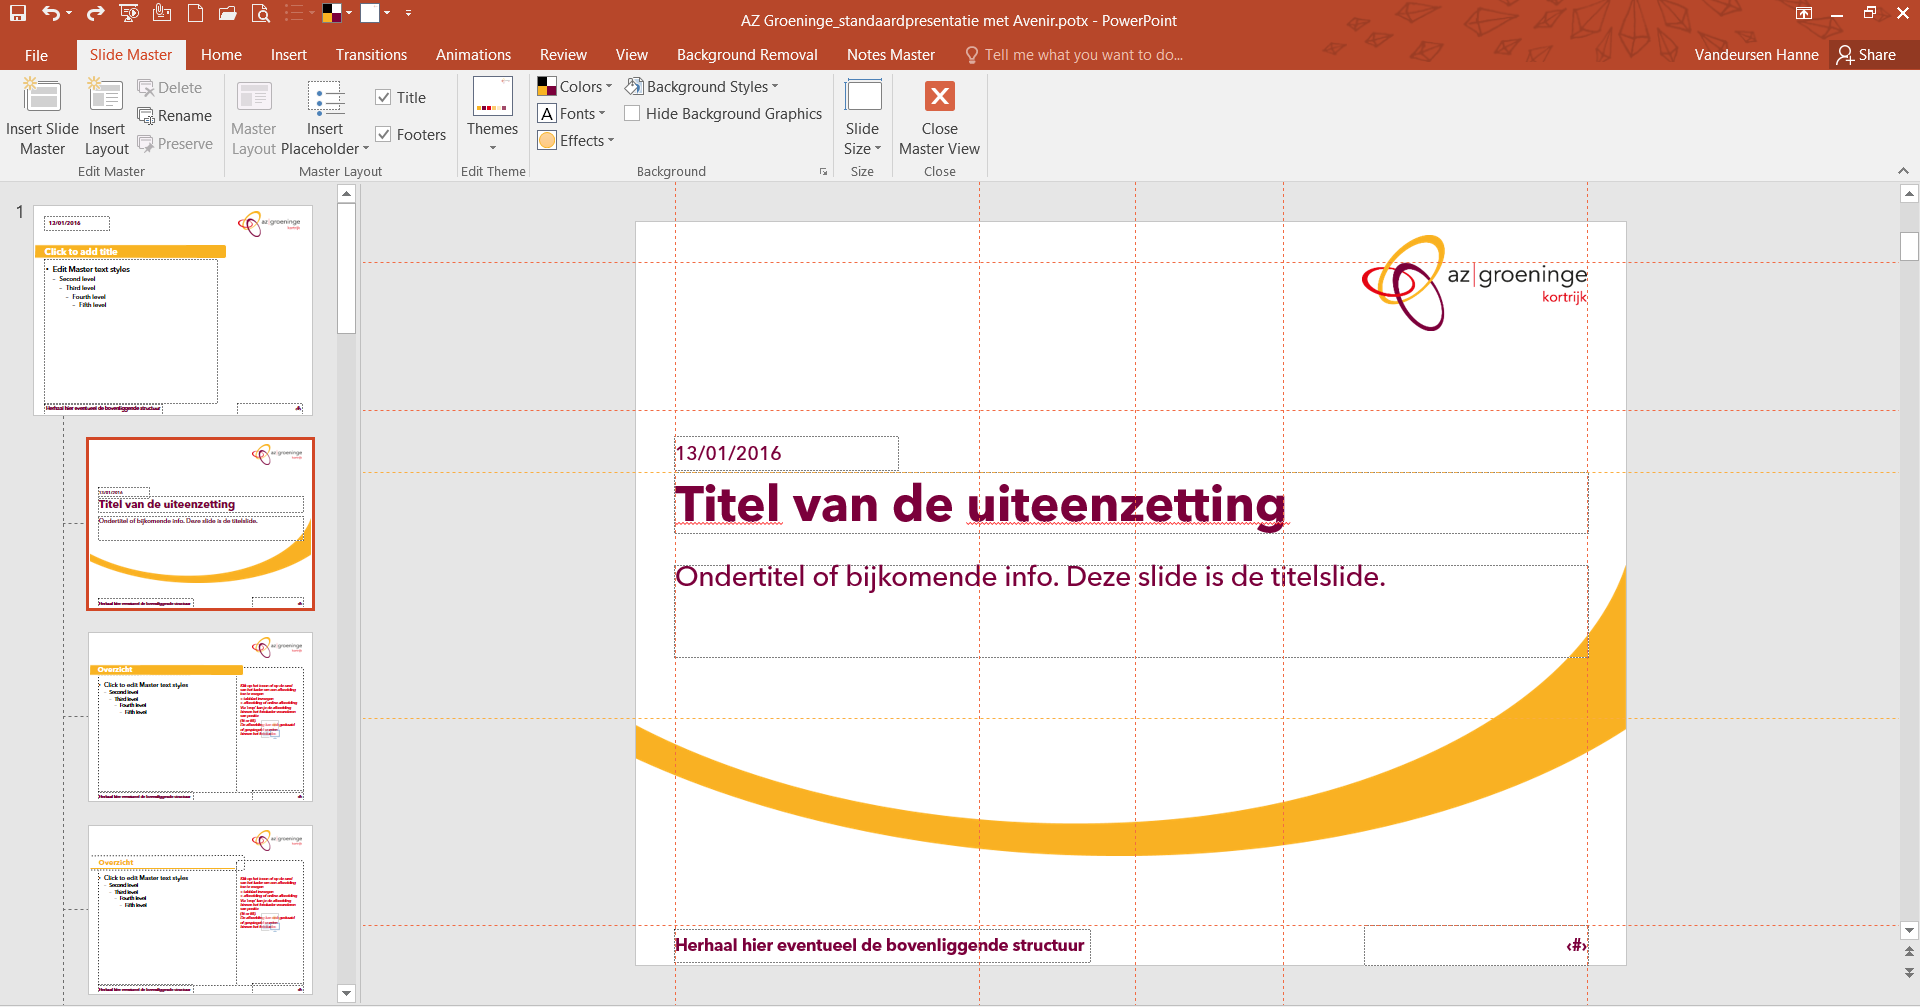
Go to the tab View and click on the command Slide Master. The first larger slide in the slide thumbnail pane on the right is the Master Layout. This slide controls the associated layouts underneath and is the key to a lot of settings and automatisms, like slide numbers.
Click on the command Master Layout on the tab Slide Master and tick the placeholder Slide Number > OK. Now the Master Layout has the # sign which you can format and position as you want (take the look and feel of your organisation into account).
Each layout positioned beneath the Master Layout has Title and Footers (i.e. date, slide number and footer) as default placeholders. You can tick these placeholders’ checkboxes on or off on the tab Slide Master. So if the slide number does not show up after you’ve adjusted the Master Layout, tick Footers (which include slide number) for each associated layout.
As of now you shouldn’t have any issues displaying slide numbers in normal view. Close the master view, go to the tab Insert and click on the command Slide Number in the group Text. Tick Slide number and choose Apply or Apply to All.
You don’t necessarily need Adobe Photoshop to surprise your colleagues with a thoughtful Christmas card. With your MS Office skills, a little creativity and some basic knowledge of graphic design you can achieve quite a good result.
This post guides you through the process of creating a Christmas card that breathes the look and feel of your organisation, starting from a blank slide in PowerPoint…
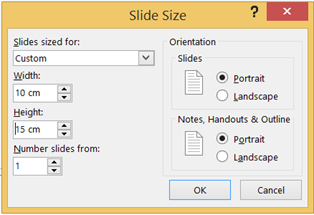
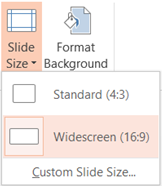
Step 1: resize the slide to the format of a greeting card. If you are planning to send it the old fashion way (which I personally love) do take the format of your envelop into account. A standard greeting card 100 x 150 mm fits a default envelop 114 x 162.
Go to the tab Design > dropdown menu Slide Size > Custom Slide Size… choose the proper width and height and decide on the orientation of your card: portrait or landscape.
Step 2: create your card The logo of your organisation will help you to get started. It is your biggest inspiration to design your card. What are the colours, fonts and shapes of the logo? If you integrate the style elements and the general style of the logo in the rest of your card, the whole will look a lot more coherent. This is another example when a customized MS Office theme comes in handy.
Insert the logo(s) (in Master View) and position them as described in the corporate style guide of your organisation. Give each logo plenty of room to breathe! Go to the tab Design and choose the theme of your organisation. Work with a layout which has no placeholders.
I’ll get to work with the logo of Howest Industrial Design Center.
Now think of Christmas and everything around it: stars, snow, christmas trees and sweet wishes,… but don’t get too excited about decorating your card: Less is more! So keep your design simple.
The following video is an example of how a christmas card in PowerPoint can be made. I’ve found the picture of the cardboard paper on the background on www.freestock.ca
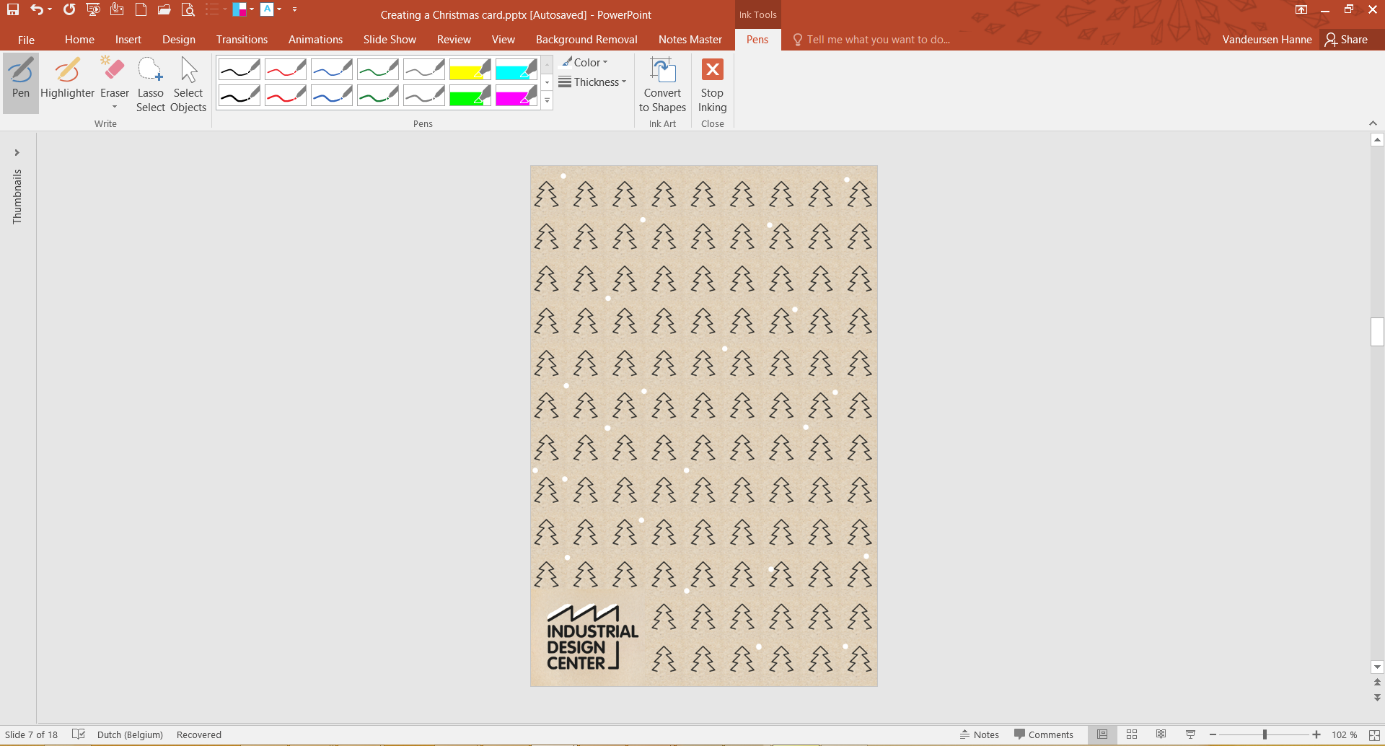
The video illustrates how to align, rotate, flip horizontal, group, make text transparant… these are a few graphic possibilities in MS Office, but there is much more! You can make your own (background) pattern for example, as the following video illustrates.
Why not insert apicture in a shape that is related to christmas, a star for example. In the post How to get your favourite image in a shape I’ve explained how to do this.
The feature Ink Annotations (only in PowerPoint 2016) makes it possible to add freehand pen and hightlighter strokes to your document. You can find it on the tab Review, Start Inking.
I’ve used it to create snowflakes and some snow on the roof of Industrial Design Center.
Step 3: save the slide as a jpeg. Once you’re done, save you slide as a jpeg. Unfortunately for some reason the quality of the image is not what it should be. You can fix this by following the instructions in this article by Motifolio.
Step 4: Print and/or share your Christmas card !
I hope you can use some of the techniques I’ve illustrated to create one yourself. If you have an idea and don’t know if it’s possible in MS Office, let me know and we can figure it out.
And don’t hestitate to share your Christmas cards!
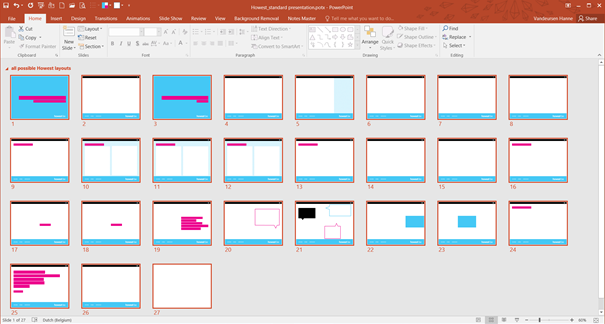
The introduction of an unique Howest template raises the question of how the staff of Howest can apply this template to an existing presentation. How smooth the conversion goes depends on a few crucial factors, just like it did with the conversion of the slide size in my previous post. And also in this story, the pre-set layouts of the Slide master are playing a major role. This proves again how important they are in terms of creating a presentation.
The slide sorter gives an overview of all the possible slide layouts of the Howest template with aspect ratio 4:3
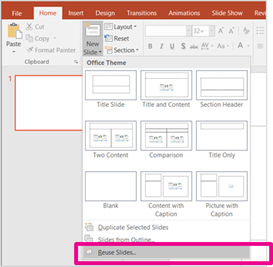
Open the template (like the 3:4 template of Howest in the picture above) that you like to use. Import the slides from an old presentation into this template via the tab Home > drop-down menu of the command New slide > the option Reuse Slides…
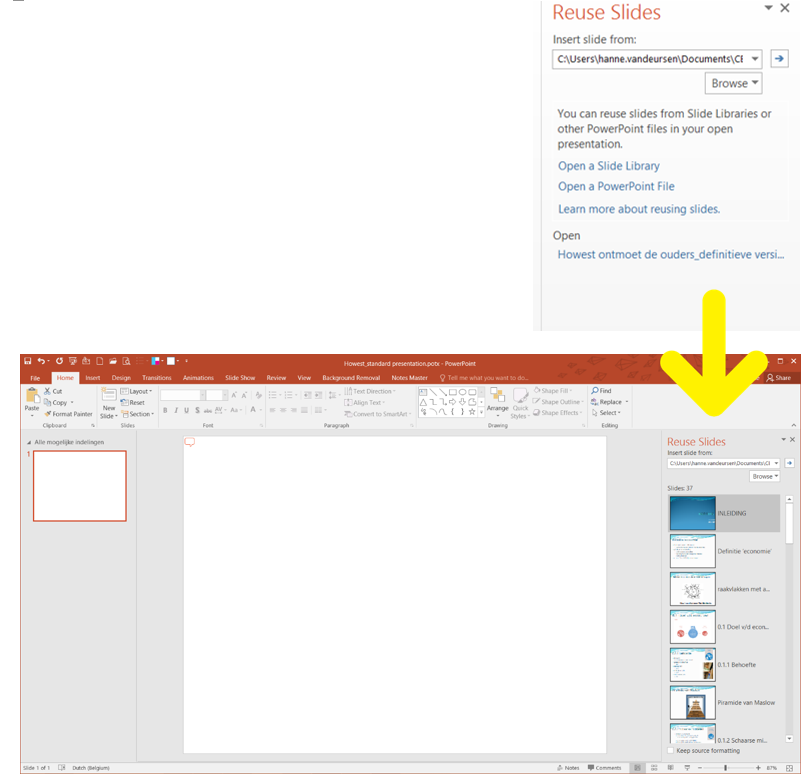
On the right, the window Reuse Slides appears. Locate the slides that you want to insert, either from a slide library or from a PowerPoint file.
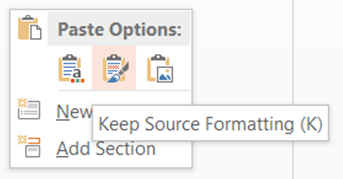
Make sure the option Keep source formatting (below the window) is ticked off before you right click on one of the slide thumbnails in the right window and select Insert All Slides.
The result after inserting all slides into the template, not quite what I had in mind…
How your presentation looks like now and in which degree the result corresponds to the layouts of the template all depends on how your old presentation was created.
If in the old presentation no layouts (or associated placeholders) of the Master View were used, you will have to transfer the content of each slide manually to a proper layout of the template.
But if your slides in Normal view are based on the layouts of the Slide master, the conversion will go more automatic. Though, you’ll still need to verify each slide and you will probably need to make quite a few minor adjustments or choose a better layout for a slide.
To change the layout of an imported slide: Click right on a slide and choose Layout. The selected layout is the current one. You change this just by selecting another one (of the desired template).
The last 5 layouts don’t belong to the original template.
Besides being patient, the best thing to do is to compare each slide in both presentations (the old one with the new one) via the Tab View > Arrange All.
Again, if you have a better workaround, feel free to share!
As promised, a sequel to the article of last week about the slide aspect ratio 4:3 and 16:9.
Most likely you will convert 4:3 format into 16:9 rather than vice versa, as widescreen has become the new standard (the 4:3 screen format of iPad is an exception) and the same goes for slides. Anyway, this blog post covers the conversion in both directions. In the article I assume that the presentation you would like to resize, is created in a template and pictures and text are inserted in placeholders.
Is this a story with a happy ending? Well, it depends on a few factors…
There are different methods of resizing your presentation. One option is to resize your presentation via the tab Design, Slide Size. Another way is to copy all the slides from the original presentation and paste them into a new presentation which has the desired aspect ratio (Choose past option Keep Source Formatting) Which path you take, does not really matter. Just make sure you work with a copy of the original presentation, because the original might come in handy in the future!
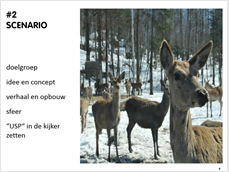
After converting a widescreen into a 4:3 format, the photo looks distorted.
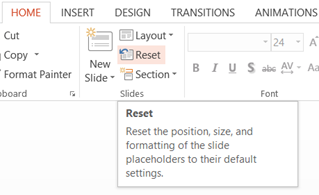
At this point all the graphics or logos in your slides will be out of proportion (Scale Height and Scale Width will be dissimilar). They will look either stretched or distorted. To fix this, select all the slides (to do so: select the first slide, hold the shift key and select the last slide) and click on Reset on the tab Home, this command resets the position, size and formatting of the slide placeholders to their default settings. So thanks to the feature Reset pictures get their normal proportions back. But you are not out of the woods yet, because there is also a drawback to this feature.
Using the pre-set layouts of the Master View is one thing concerning formatting slides, but not the only one. Often, there has been also a lot of “direct formatting” in Normal view. A few examples to clarify what I mean: pictures you’ve positioned via the crop tool in the placeholder, font colour you’ve changed, words you’ve made bold, new layouts you’ve created because the layout you are looking for was not foreseen in the template,… The Reset feature takes no account of these kind of adjustments in Normal View. They just get lost after clicking Reset.
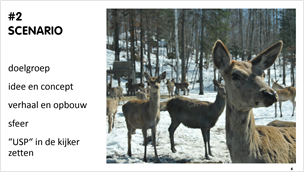
After converting a widescreen into a 4:3 format and clicking on Reset, the photo looks okay, must be repositioned in the placeholder again.
If you know for sure you haven’t done a lot of this “direct formatting”, the story ends well for you (checking the font size and indentation is the only thing left to do, because they might have changed after conversion).
But it can be quite frustrating if you’ve made a lot of these little changes in the Normal view and time consuming to restore everything to the way it was before… As an alternative you can leave the Reset feature for what it is and Crop > Fill each picture via the contextual tab Picture tools which appear after selecting a picture.
Converting slides often takes a long time. If you know a more efficient way or a magical button to convert slides without losing any direct formatting AND with respect to the aspect ratio of the pictures, please share and make my day!
Things you might have heard before, but are a good reminder.
Pictures are superior to text!
Maybe you remember in primary school how you showed the rest of the class pictures when you had to give a talk, those pictures from back than are the slides of today. You do the talking, the slides are there to visually support your message.
A picture is worth a thousand words, at least a good picture! So be picky in selecting images, use high quality and vivid photos.
Limit text on your slide, get rid of details and include only the essentials (you can mention details in your speaking notes)
All text should be short and snappy: use powerful single words, short sentences or a few concise sentences.
Bring up one main idea per slide: don’t overload your audience with too much information at once, give them time to process all information.
Before you start designing a new presentation, you do well to ask yourself what slide format you need to give your public an optimal viewing experience. Should your slides have 4:3 or 16:9 aspect ratio to make full use of the projection screen? PowerPoint does not help you which format to choose, it opens a new presentation automatically in widescreen format. So be aware!
The standard output on monitors and screens used to be 4:3. Now the format of most screens is 16:9 or widescreen. PowerPoint has gone through the same evolution, as since 2010 the default dimensions of new presentations are 16:9 (although the slide size 4:3 is still called ‘Standard’ in PowerPoint)
Forewarned is forearmed, but sometimes you do not know in advance which kind of screen will be used. If you’ve made the wrong choice and made a widescreen presentation that you have to display on a 4:3 projector screen or vice versa, your slides will not fill the entire screen. Either horizontally or vertically you’re will lose a part of your projection space. The black bars in the pictures underneath illustrate this.
So the worst case scenario is not too bad! But try to avoid it if you can.
Of course, you can convert your presentation into the right format, but this can cost you a great deal of time. In a future article I’ll tell you how to fix this.
Introducing PowerPoint Designer and Morph, new intelligent tools that automate the creation of slides and presentations—helping everyone get more out of Microsoft Office. With a cloud-powered recommendation engine and smart animation technology, these new PowerPoint capabilities help anyone create polished slides and captivating motion effects with just a few quick steps.
In the view Slide Master of PowerPoint, you can insert both text boxes as text placeholders. Both seem the same at first sight, but when you return to the normal view of your presentation differences become cleary noticeable. This post highlights the differences between text boxes and text placeholders or, in a wider context, between shapes and placeholders.
Even if you’ve never heard of Placeholders before, you are probably more familiar with them then you might think. Take the first slide of a new presentation for example. It contains two frames in which you can enter text according to the instructions, but which you also can delete, resize, colour,…. These flexible frames look like text boxes but are in fact Text Placeholders.
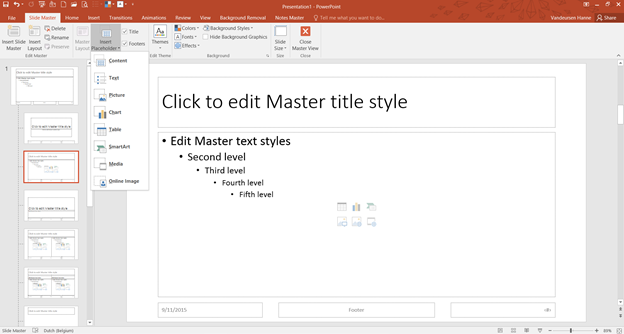
If you go to the Slide Master and scroll through the different layouts you’ll notice that there are -in addition to frames for text- also frames for pictures, charts, tables, SmartArt, Media, Online pictures or content in general. These are all placeholders.
If you make your own template, you can insert these placeholders by the feature Insert Placeholder on the tab Slide Master.
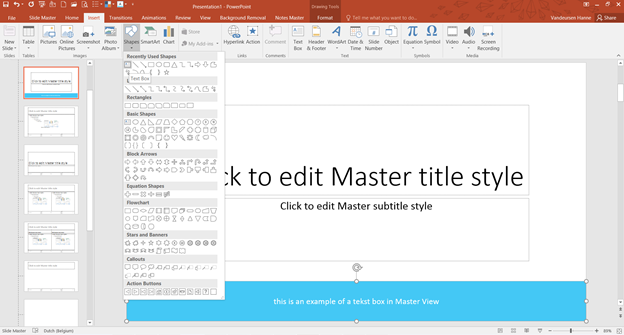
Besides placeholders, you can also insert shapes (including text boxes) in the Slide Master view. But unlike the first, shapes cannot be adjusted in the normal view. If you insert for example a blue text box in the Master view and return to the view Normal, you will notice that this is a fixed element on the slide which is impossible to select, and thus impossible to adjust.
There is also a second difference between placeholders and shapes: a placeholder can be put on the back or foreground on the slide whereas a shape will always remain in the background when you insert them into the slide master.
However, both shapes and placeholders are useful when it comes down to making a PowerPoint template. How to use these two elements correctly is for a future post.
There are a few issues with the PowerPoint template of Howest that both users and I would like to see resolved. Now they cause confusion and lead to an inconsistent Howest look (and most likely we are not the only one with this issue).
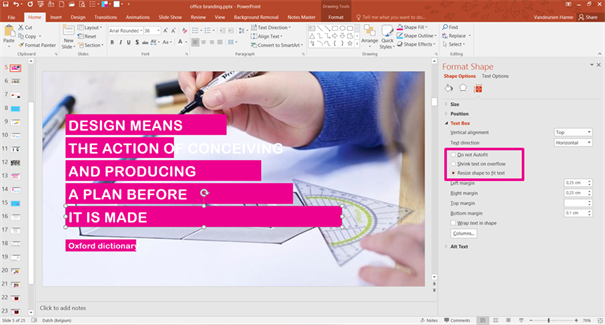
Difficulties arise in two specific situations: when users switch the layout of a slide or use the feature ‘Reset’ in normal view. In both situations pink placeholders with the Slide Master settings ‘resize shape to fit text’ are involved.
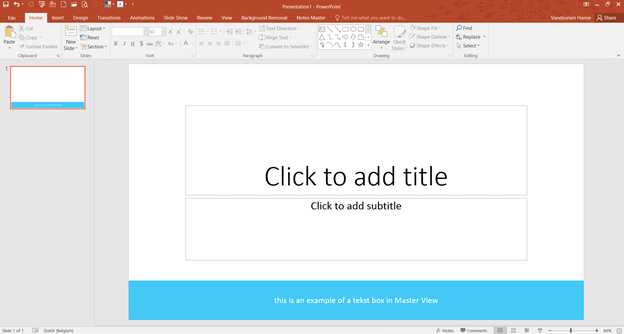
The Slide master slides contain instructions for the user.
The first time you enter text in such pink bar (in normal view) the size of the bar corresponds to the length of the text. Settings go into effect as you would expect.
But when you use the feature Reset the pink bars take over the bar size of the Slide Master. Although the setting ‘resize shape to fit text’ is checked, the size of the bars do not longer correspond to the length of the text.
The feature Reset “resets the position, size, and formatting of the slide placeholders to their default settings”. This is taken very literally if you click on Reset.
The same happens when you change the layout of a slide with a pink banner via the feature Layout on the tab Home.
To get this right, you briefly need to check another option (for example ‘Shrink text on overflow’) before checking the option ‘resize shape to fit text’ again.